Friday, August 12, 2011

How To Be A Rebel Bride - Guest List Edition

Every one says how important it is to get a guest list together before you get too deep into wedding planning. Those people would be 100% right. Because we only had a tentative guest list of ~250 people, we felt confident that all the venues we were looking at would work no problem.

Me, Mr. Kettle, Momma and Daddy Kettle, FSIL Grand, and Mima and Dad Kettle, all sat down and hashed out a preliminary guest list. But then the numbers began creeping up. Mima Kettle thought of more people who had to be invited. Most were family, so we added them.

I have no idea what the total number of people were who were suggested to be on the list. But I think between the 7 of us, that list had the potential to be almost 500 people had we included everyone. That definitely wasn't going to work.

In that first meeting, I saw my dreams of a smaller guest list wedding going away and never coming back. I re-assessed my priorities and realized it was probably better to include more people if it fit in the budget because that meant a bigger party and more people there we cared about.

So, you must be asking, where does the rebellion come in? The fight I had on my hands to get everyone's addresses required a bit of rebellion on my part and Mr. Kettle's part too.


I had a certain date I wanted to send out the STDs by. When that date came and gone, it was time to send out e-party invites as well. We wanted to send them out 6 weeks before the e-party. That date came and gone.

We had to do a bit of... arm twisting to get all our addresses. People's addresses change, they move etc. But we still needed addresses.

Neither Mr. Kettle nor I make a habit of treating our parents like anything other than parents. But when they weren't coming up with their addresses, we had to make some tough choices.

  • People we had fought to keep on the list got taken off when their addresses weren't found by the time we had to print off our envelopes.
  • Mr. Kettle had a pretty heated conversation with Mima Kettle about taking off some of their cousins and church members. He was amazing in getting the list cut down to less than 325 people total.
  • I e-mailed numerous e-mailed to Momma and Daddy Kettle to get their addresses.
It was an uncomfortable time, but we got it done. And at least it's done now. Unless more people move in the next 3 months, we're done tracking down hundreds of addresses.

Momma Kettle and I were still struggling with how we would organize a seating chart for all those people into the two rooms at Chateau Bu-Sche. Every person that could come off the list was only a benefit.

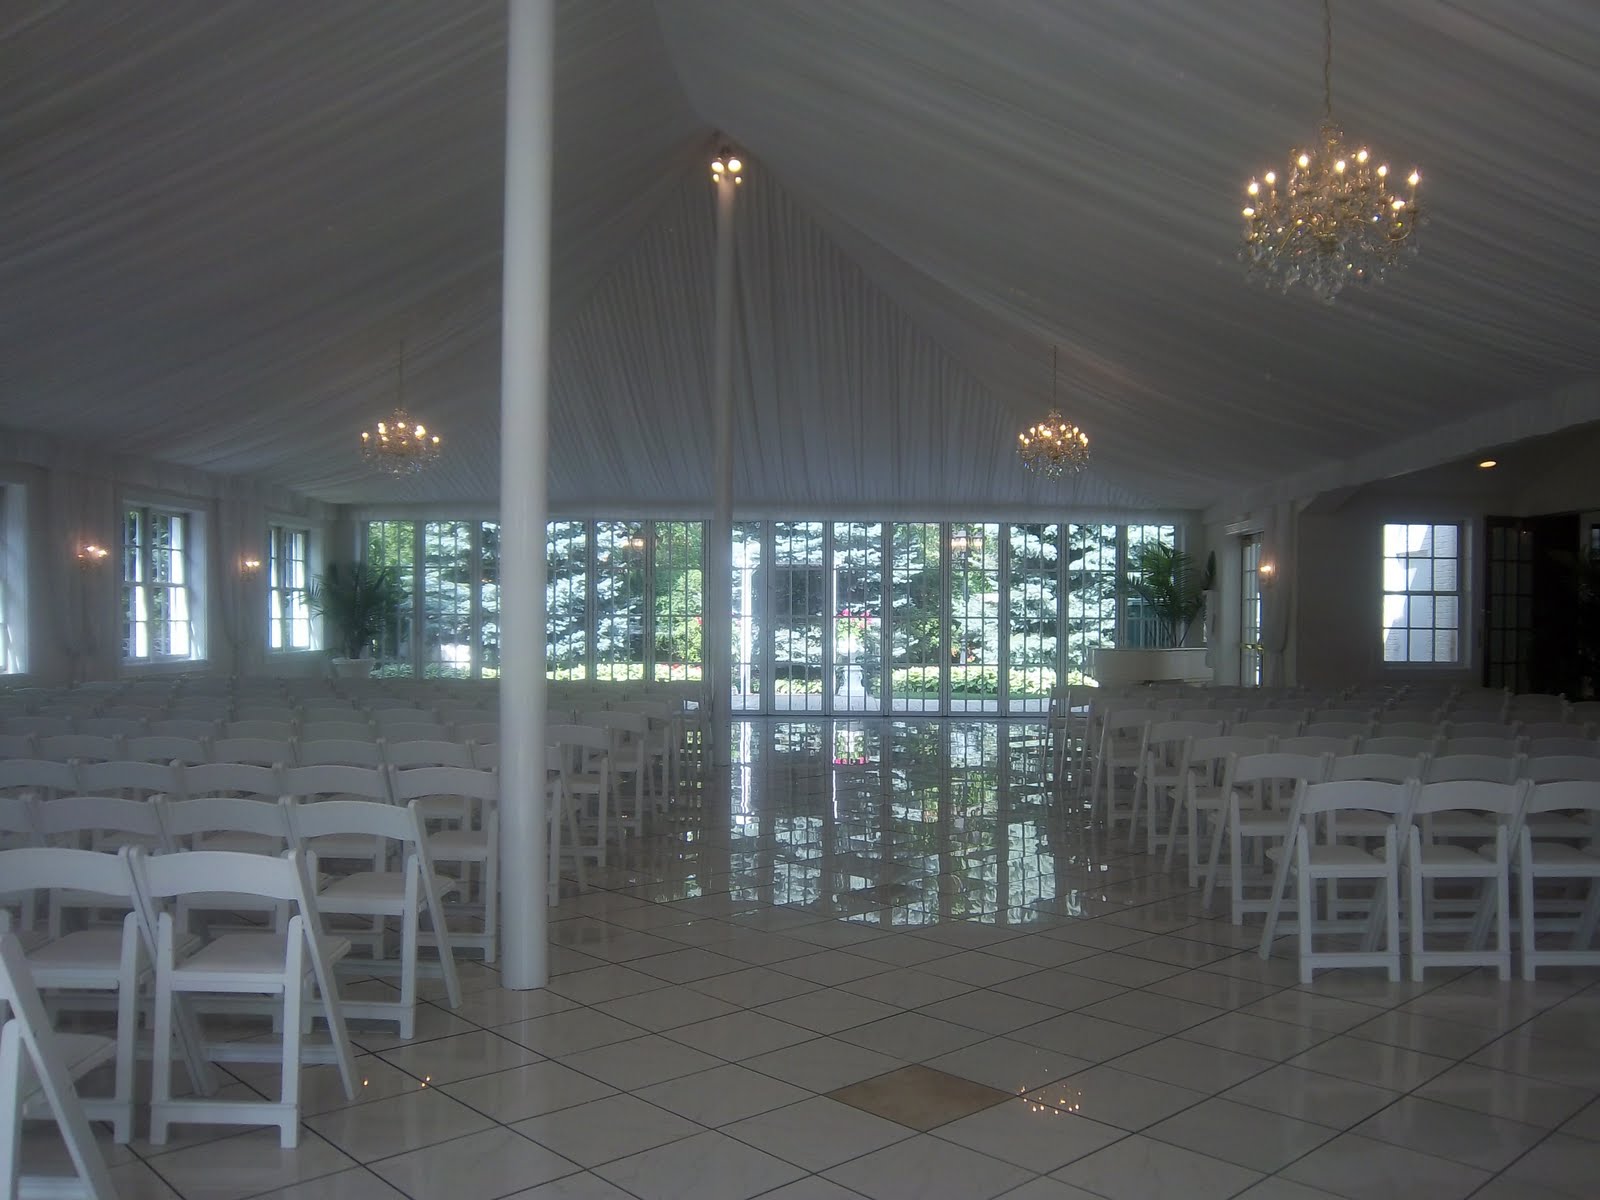
Personal photo: Our ceremony will be here, but also our reception.


Personal photo: We will also use this adjoining room because our gargantuan wedding won't fit into just the atrium above.

I'm still mystified as to how we ended up with an invite list of over 300 and there wasn't a single person on that list who could come off. It's mystifying.

Did you have a hard time getting your guest list done? Did your family have addresses for the guests they wanted to invite?

Keeping Track Of My Handle And My Spout

I'm not exactly a Type A personality, but being organized is super important to me. Marrying a man like Mr. Kettle makes that all the more important. We each have things we forget, and of course they're different types of forgetting. That type of behavior doesn't gel with effective wedding planning.

Seeing as how we didn't want to pay money for a wedding planner, just a Day of Coordinator, it was imperative that I stayed very organized while putting together the details of my wedding.

I managed to get some big decisions handled up front. At least they seemed big at the time. Then five minutes later, I think about everything thing else left to do and that one item checked off seems like nothing. I feel this way every time.

Enter a two-fold solution: A wedding binder and a wedding website. I have both and so far I'm super glad I do. Some things I have recorded in both. Others I use just one or the other.

As I mentioned before, I got a binder from Russell and Hazel.

This Russel + Hazel wedding planner became my best friend. From Office Depot, I got a calendar, page protectors, highlighters, colored gel pens, and a briefcase. The briefcase has a dual purpose. This wedding binder will have to be carried with me everywhere I go from now until February 11th, so I wanted something to carry it in that wasn't my purse. Cause that sucker is huge!

Personal photo: This is the super cute bag I got for my binder.

Personal photo: This is the binder all full up with everything.
Personal photo: I ordered the binder in gold before I knew gold would be our accent color. I'm telling you, it pays to go with your gut.

Personal photo: Table of contents, the first big step to good organization

Personal photo: I keep business cards and color swatches in here. On the right, you'll see a piece of the tie of Mr. Kettle's that's part of our color scheme.

Keeping up with my work schedule, Easy's practice/gig schedule, plus appointments and meetings for this wedding is the biggest task with the calender, but with the highlighters, I have color coded our calendar.
Personal photo: Yeah, that's just July. Gigs, work, and meetings Oh My!
And there is also the website. I use weddingwire.com. I like that website. We looked at three different ones and Mr. Kettle picked this one. People can access all our events, RSVP to everything, sign our guest book, and even submit songs for the DJ to play!

The best part is the behind the scenes stuff though. I keep track of my wedding budget there. If it weren't for weddingwire, we wouldn't have been able to play around with the numbers to see about expanding our budget (anyone catch that hint?). I also have a very amazing to-do list there that the website generates and I use. It's much more detailed than the one from the binder.

If you're still looking to setup an organization system, I recommend href="http://shorl.com/stygrodrofuhadri">WeddingWire. You can really personalize the website for your guests, and the behind-the-scenes stuff is super useful!

Just writing this all out seems like soooooooo much to me. But it will be worth it to stay organized and on top of things. Or am I just crazy? Probably a little of column A and a little of column B.

Kettle Tea Party Reminder, Take One

I saw all these things online, including Weddingbee, about brides who had designed their own save the dates. There were the picture booth STDs, the refrigerator magnet STD, the personal photo STDs. And then there were STDs that were some lovely combination of the three.

I thought, "I could do that!" I work 12 hour shifts sitting in front of a computer, I can knock those out with my occasional free time in a couple of shifts!" So I headed over to Vistaprint.com to see what I could come up with.

I quickly learned the easier thing to do was to design something myself about the right size on my beloved Microsoft Word and upload it as my own design. Making it the size of a postcard was waaaaay cheaper than paying $7.99 for every 10 invites of a different size.

Wedding Planning Tip #5: If you have a large guest list, don't order anything that only comes in sets of 10, except party favors.

I got to work designing the invitations. I used that first color that we came up with. The one that's on the Thank You wreath. I felt pretty proud of my design. I was feeling confident that I could easily design our wedding invitations as well since this had been so painless.


Personal photo: Original STD design
 I thought they were perfect. They were fun and casual, like an STD should be, but they also set a great tone for the wedding. They looked fun, full of love, and they used our colors beautifully. Plus, I was able to feature some of my favorites of the e-photos.
I was very satisfied with these and *brushing off my shoulders* in a very smug congratulatory manner. Trust me hive when I say, the higher you sail, the farther you fall.

I e-mailed these to Momma Kettle and Mr. Kettle. Mr Kettle said they were cool, Momma Kettle said they were alright. Not quite the standing ovation I was expecting.

Then more things happened.

1. I realized I'd forgotten to use the Save-The-Date Bunting picture. The one I spent hours preparing with FSIL Hon. I'd completely forgotten that ever-so-important-at-the-time project.

2. We changed our wedding colors. The guys had been waffling between gray and black and when they settled on black, that fade to gray in the picture just didn't work.

3. We hadn't actually sorted out how many people we were inviting, so I didn't actually know how many to order. At first I wanted to order 300 because that's how many guests we were inviting. Then I realized, we're not inviting that many households!!!!

4. Apparently, I worded it wrong too. "Formal Invitations to Follow" should read "Formal Invitation to Follow" My mother is a huge fan of appropriate etiquette and wording, as am I, so this just wouldn't do.

This was quite the epic fail on my part. Epic fail. I was lucky enough that the order I placed, for 300 STDs in the wrong color, could be cancelled and re-done.

I then began changing the STDs over and over again. My confidence shaken, I changed it at least 6 more times before settling on one. But by then, it was time to send out invitations for our e-party and our Moo cards. Sigh, it was quite a process. I'll show you all the final product after I've talked about our engagement party planning, which actually took place last Saturday!

Did you grow wiser and smarter after a DIY attempt fail? How did your STDs turn out?

Kettle Color Cull

Anyone want to say this post title three times fast? It's hard. Hehe, I crack me up.

Okay hive, it was quite the journey to our current color palette, but I'm very happy with how it turned out. I've alluded to our colors here and there and mentioned some changes we went through. Ultimately, I'm very happy with how it turned out.

When Mr. Kettle first proposed, I was thinking blue. Like a nice, happy, royal blue.

Image: Royal Blue Tuxedo Vest from Tuxedos Online
That didn't last long. Mr. Kettle and I agreed to it the night we got engaged, and we told my parents the idea and they loved it. Within 24 hours, his mother Mima Kettle suggested we do more of a royal purple instead.

Image: Royal Purple Paint Color from Art-Paints.com
Everyone liked that idea, including me. I was trying to pick a color that wasn't too feminine, but Mr. Kettle liked the idea of purple. So that became our color.

I was hesitant to nail down the rest of our colors because I knew I didn't want a white dress, but I didn't know what color I'd end up with. I was still thinking about that floral number. We were in color limbo for a couple weeks just on that image alone.

Luckily, Momma Kettle and I, along with FNIL Sniffles, FSIL Grand, and FSIL Hon, quickly chose a wedding dress for me. Knowing I'd have a taupe/tan/coffee/whatever dress (yes, those of you who guessed that one have yet another tip that you're thinking of the right dress!), I was given a bit more direction for the colors.

Mr. Kettle had this tie I hated, but I noticed was the perfect color scheme. The taupe in it perfectly matched my dress and it looked great next to black. Also, there were gold accents in the tie that matched something else: my shoes!


Image: Badgley Mischka Foxy Pumps / Available for Sale on Weddingbee by norahw!
I saw these lovely shoes in Lord and Taylor when I was shopping for birthday shoes last October. I immediately purchased them. I danced the night away and haven't worn them since because they're so fancy. I brought them with me to try on with wedding dresses and they went so well with my dress, it was an easy decision to make these my Something Old!

So we had purple, taupe/tan/coffee/whatever, and black, with gold accents. I felt like we needed to pick either white or ivory to round out the colors, but I couldn't decide. I did know I could see a sea of white-ish roses for bouquets or decorations, so we had to pick something in that value range.
There was a purple bridesmaid dress in there that went perfectly with my dress, the shades were sooo complimentary. That was the color I went with for my Thank You wreath for our e-pics. But that color choice didn't last long.

I'll explain how we got away from that shade of purple when I explain how we ended up with the bridesmaid dresses for my ladies. But just know for now that after searching for dresses, we changed to a magical color created by one Bill Levkoff called Regency.


Image: Bill Levkoff Color Swatch by Ella Park Bridal
 That color was a magical special color. It looks purple in real life. A beautiful, rich purple that compliments the skin tone of all my girls. And bonus, it photographs blue! And the blue color that shows up in photos is very similar to the color I wanted in the first place.

I couldn't decide between white and ivory so I basically flipped a mental coin and picked ivory because the color felt richer and warmer, which made me feel better emotionally about the colors for our wedding.

So now, our colors are: Regency, Coffee, Ivory, Black, and Gold accents. Thanks to Adobe Kuler, I was able to play around until I got just the right colors for our color palette.

By now you're all thinking, "enough talking! Just show us the colors!!!" Okay, here you go.


Image: Color Palette on Adobe Kuler
Having this palette has been super useful for things like our wedding invitations, which have just begun to be designed, yay!

Also for flower choices, and to help the guys visualize what color vests they'll be wearing. Which could be any of those. Except the gold. This isn't the 1970s.

How did you choose your color palette? Did it change a million times?

Thursday, August 11, 2011

A Flush Tea Photo Shoot

What's Flush Tea?

Taking that first crack at looking natural in the photographer was no easy task for me, but before we even got there, we had to find a photographer.

For some reason, finding a photographer for this wedding has been a major source of stress for me with the wedding planning. I didn't know this at first, so I dove into finding a photographer with the same gusto as everything else. Mucho gusto that is.

But then I hit a wall. I had too many photographers. I was getting follow-up calls at the most inconvenient times. I couldn't coordinate schedules with Momma Kettle or Mr. Kettle to set-up meetings. I began avoiding the calls like I was avoiding a bill collector. It was bad y'all.
Image: Lockhorn Vs. Lockhorn Blog / Cartoon by The Lockhorns

The biggest thing is that I wanted engagement photos taken. And I wanted to use those photos as our STDs. I had already made the bunting banner!! And I wanted to get these photos done by the end of June. I had to find a photographer at least for our engagement photo shoot.

I knew there was no way I was going to end up with a package deal for e-photos on top of the wedding so I let that go pretty quickly. The next job was to find a photographer who wouldn't hound me to sign a contract for all our wedding photos.

Enter Mr. Kettle to the rescue with his amazing, I'm-a-musician-plus-I-have-a-ridiculously-large-family connections. In the span of a week, I collected business cards and phone numbers from probably four different photographers just by going to family events and gigs with him.

We ultimately decided to go with his cousin who's a photographer. I went to his website and I checked out his photos. I wanted photos of Mr. Kettle and I, just being us with no embellishment. His photos looked just like that.

For his price ($300), we got a photo shoot. He was open to as long as we needed in as many places as we wanted. He also agreed to give us a CD with the images as well as access to his website to download them whenever. Gotta love that family connection!

I ended up getting an opportunity to make our moo cards and STDs earlier than expected, but he was on it. He had our photos available for me to use within a couple days. If you're looking for a photographer in the Chicago area, send me a private message, and I'll tell you how to contact him.

We decided on just one location for our pics because we didn't have a whole bunch of time that day. Mr. Kettle took a gig (which is a recurring theme on pre-wedding stuff days). I'm not gonna tell where we took the photos just yet, I want to see if any Chicagoans can figure it out!

I chose this place because it is literally my favorite place on the planet. I love that it's this escape in the midst of so much bustle. I can sit on a bench and read my Kindle and feel like I'm tucked away from the world, but so close to the pulse of it all. So without further ado, our e-pics!

All Images from The Nu3 Buzz Media
I started off incredibly awkward. Mr. Kettle has done photo shoots for album covers, so he was better.

Still standing awkward, making photos I barely want to use for our thank you cards...

What to do with my arms? So many decisions. At least Mr. Kettle has an amazing smile in this one. And of course, the wreath looks fantastic!

At this point, we were having waaay to much fun. But look how great our STD Bunting looks!

The bunting is really popping in this photo. Too bad we decided the kissy photos might be a bit too much, cause I really love this one.

My smile is still awkward, my hand it too pose-y, and the wind was blowing the bunting. I was feeling pretty proud about the durability of the banner at this point.

What was Mr. Kettle pointing at? This is the obligatory walk-toward-the-camera shot.

I had just started getting comfortable and actually be able to have a private moment even though a family member was nearby and lots o' passersby were noticing us.

I ended up using this one on our wedding website cause it's so playful. I had been dying to have my sunlight-streaming-through-the leaves shot. Yay!


Yeah, we kinda got into the kiss. Cue uncomfortable averted eyes. I do love this shot. Maybe I'll frame it and put it up in our house.

If I didn't like a turtle here, I'd like this shot a lot more. Mr. Kettle looks so protective and safe.

There is a crazy story behind this photo.
 Mr. Kettle is looking to see which bird had just pooped on me and whether he was still up there. We sat on the grass to take pics and a bird promptly pooed on me.

I thought it was a bug on me until I noticed the "bug" was soaking into my dress. Good thing cousin photographer's girlfriend was there. She helped de-poo my dress and we moved forward. Mr. Kettle told me I couldn't be a bridezilla because I didn't freak out about the incident or let it ruin the rest of our day.

More weird smiles. But I think I just have weird laugh-y faces maybe. I put this one up for the background. Can anyone guess what that is in the background?

This is a favorite. This went on the website, on our moo cards, and I'm considering getting it framed.

More awkwardness. I couldn't stare off into space. Who knew that was so hard?
 I do love the shots of us on the bench. The whole time I was asking Mr. Kettle, "where are you looking?" He'd respond, "at the light pole." Then I'd go, "Which light pole? The top, middle or bottom? I want us looking at the same spot so this pic doesn't look weird."

Turns out over thinking a photo can do that too...

Since we were in the park, we had to go to the playground. While we were pretending to be carefree and fun, we actually had a lot of fun.

This is the pinnacle of awkwardness. I didn't know how to stand. Apparently, I'm too pose-y.

Oh wait, it gets worse.

Mr. Kettle is, of course, a natural. Sooooo cute. Sigh, I love that man!

This was better, no?
I think our cousin photographer gave up on getting me to be "natural". We took hundreds of photos, so we wound it down and headed to Mr. Kettles gig.

The shoot was actually a lot of fun. I was amazed with how good some of the pictures looked in spite of my awkwardness.
Wedding Planning Tip #4: if you have a chance to take pics before the wedding, do it! Get comfortable in front of the camera, you will appreciate getting past the awkwardness.

I did learn that comfort with the photographer helps. I want all family and friends to be guests at the wedding, not vendors. So we're back on the hunt for another photographer. And by we, I mean Mr. Kettle and FSIL Grand.

D-I-Y Didn't I Outsource... Inviting Our Wedding Party

Hive, I must tell you, the first two DIY projects I talked about weren't actually my first. You're never supposed to lie about your first, but.. I was ashamed. I was proud of what I did at the time, but then... well...

You look on Weddingbee and someone points out how something you just spent hours on was probably a terribly unimaginative, wholly unimportant, overwhelmingly uncreative waste of time and money. They weren't talking about you specifically, they were talking about your type of project. You hang your head in shame and vow never to speak of your first.

An amazing amount of creativity finds it way to the surface and you are overwhelmingly uncreative no more. Your unimportance suddenly is less whole and your imagination is far less terrible. The clouds part and you put out good work.


I did the Thank You wreath and the Save The Date Bunting in mid June and felt really proud of it. But as more time passed, I became less ashamed of my project from early June. I've decided to own up and show you my real first. So what if it's a terribly unimaginative, wholly unimportant, overwhelmingly uncreative waste of time and money? I worked hard on it and got my desired results.

So just what am I talking about hive? I'm talking about inviting our wedding party to join us in our wedding party. Even with our large number, we had already asked pretty much everyone except the officiants before we were engaged. So it wasn't a surprise to them what we wanted.

Still, I wanted something more formal. Something they could look back on. Something to seal the deal. And as much as all those beautiful hand-made wedding party invites I've seen around Weddingbee tugged at my heartstrings, I knew there was no way Mr. Kettle and I were about to hand-make 30+ invitations.

So I turned to my best friend for making stuff on my PC: Microsoft Word. I know, I know, why not upgrade to Publisher? Why not use any of the many programs that come standard on a PC just for that purpose? I'm a rebel and I like what I like.


I got on Microsoft Word and began searching for templates. After going through a number of templates, I found one that looked like it was close-ish to the right colors. At that time we were going for blue, not purple.

Also, I hadn't yet decided I was set so firmly against hearts in my not-Valentine's-themed wedding. Plus, I know I'm a sucker for straight lines and striped. So I picked a template and went about trying to make it personal for each person.

This basically involved changing the words to say "Bridesmaid" or "Bridal Attendant" or "Officiant". There wasn't a whole lot to do. We printed them off on this really cute and special fancy paper and I began folding. I left space on each one for Mr. Kettle and I to write a personalized message in it. We split it up according to who's family/friend was being included in the wedding.


Personal Photo: Oh yeah, four-fold Microsoft template. Don't worry, I wasn't under any delusions of creativity with this one.

Personal Photo: I did like the wording, even if I didn't come up with it myself. I did come up with that blue text box on the inside. That counts for something, right?
Personal Photo: These wedding bells turned out to be something that showed up in other places throughout the wedding. Two of everything is an unofficial theme.

We got the envelopes and stuffed them. This will be the only thing for the wedding I would dare hand-address. My handwriting is pretty terrible, so I wouldn't do it for more than 50 things. And all our wedding events have at least 100 people attending.


Personal Photo: Almost forgot to the show the front cover. I messed around with the color, but not much else.

Personal Photo: These envelopes are surprisingly amazing. And super affordable.

Personal Photo: I really liked this paper. The weight wasn't too heavy, and the color was fabulous. It's part of the reason I keep flip-flopping between pure white and creamy ivory for our wedding color.

Personal Photo: Sorry I had to cover up most of this. But I did want you to at least get a glimpse of my sometimey handwriting.

Not my most creative DIY, but our friends and family really enjoyed getting these in the mail. Seeing as how we'd asked most of them to participate before we even were engaged, this made it official for them I think.

How did you invited your WP? Was your invitation waaaay better than mine?

D-I-Y Didn't I Outsource... A Wreath for Our Thank You Cards

While I was working on the STD Bunting, I was also working on my idea for our thank you cards. I'd seen around the internet some ideas for thank you cards incorporating pictures of the brides and groom with a sign saying thank you. I loved idea soooo much.

Once I realized I'd use the bunting to say Save-The-Date, I wanted to do something different for our Thank You cards. I knew I'd rather have the pictures be from our engagement photos as opposed to our wedding photos, so I needed to get it done immediately.

While at Michaels, I was strolling around and stumbled across the wooden number/letter aisle. I don't know why, but I really like wooden letters. And then the wheels began turning. I could paint those in our wedding colors! Oh yeah, and I could attach them to... something. Then inspiration struck! At the front of the store, they had all sorts of doo-dads for hanging.

It was an Ah-mazing sale on wreaths and wreath hangers. Feeling pretty pleased with my idea, I headed to the paint aisle to see if they had the right colors. They did! Winning! I quickly grabbed up small bottles in the colors of our wedding (at least what they used to be). Since I was over there, I grabbed some fake baby's breath to add more flair. I was ready to get to work.

This is the aisle at Michael's. Soooo many letters and numbers just waiting to be jazzed up. Crafty droool.

I almost tried to incorporate these letters in some sort of monogram, but couldn't figure out how to make it work. Any ideas?
 For this project, I needed:

  • My lovely trusty glue gun. I used it to attach the letters and baby's breath to the wreath.
  • Wooden letters. Just enough to spell out T-H-A-N-K Y-O-U.
  • Wreath.  I got a grapevine leaf because I loved that rich dark color. And the size was 14" I believe, just right for what I wanted (and on sale!).
  • Fake flowers. I picked baby's breath, 'cause I love me some baby's breath. Also, I felt bigger or more numerous flowers would be too gaudy for what I was envisioning.
  • Paint. I picked up paint in four of our colors on the off chance I might find a way to use them all.
  • Paintbrushes. To put the paint on the letters, one needs a paintbrush. or at least
  • Tarp for working area.  I was using Mima Kettle's dining room table, so I definitely needed a tarp to protect my working surface.
.
Personal photo: Here is the layout of every think I'd be using; some of that is the stuff I used  for the STD Bunting.

Personal photo: I laid the letters out and tried to figure out just how to color them so they really popped.

Personal photo: That's Mr. Kettle helping. He's about as helpful as Kitty Pot. He's reading and eating Sun Chips. Gotta give him points for being healthy and exercising his mind, right?

Personal photo: I had him take a picture of me painting the letters. I started with black and put that on the sides of every letter. I still hadn't figured out what other colors to use or how yet.

Personal photo: There are a lot o' crevices in these wooden letters.
 I was using a small paintbrush, but even that was too large for some of those inner corners. I suggest you get something tiny, like this floss/tooth picker thingee, to get the paint into those colors. I figured that would be easier than having to apply 6 coats of tan paint to cover up getting black all over the front and back of the letters.
Personal photo: I decided to use them all because I couldn't choose. I also painted both the back and front of each letter because I also hadn't yet sorted how to attach and I didn't know if both sides of the letters would be seen.

Personal photo: I laid the wreath out and began contemplating the baby's breath layout. I ended up cutting the fake flower into sectional pieces to insert around the wreath.

Personal photo: The fabric at the top of this picture was what we were using for our color swatches.
One of those swatches was a tie of Mr. Kettle's that had the right color combo for our tan and black ideas. The other is purple and was from a bridesmaid dress shawl that was the perfect color to match my dress.

Personal photo: My trusty lovely glue gun. It's a tiny thing, just like me. It's very effective, and kind of fun to watch the mini glue sticks feeding into it. Did I mention I'm quirky?

Personal photo: This was after I'd glued down all the letters. I just used glue, which was tricky to get it to attach to a non-flat surface, but I think it worked out.
 Figuring out the angle for the letters was no small task, but I enjoyed working it out. I tried to go for mostly straight on, or angling a bit upward. I figured that would make the black on the edged of the letters look like a cool shadow effect and pop nicely in pictures.

Personal photo: After adding baby's breath and hanging on the hook, here is my completed project!
 I'm really proud of how this turned out. I can't wait to show our e-photos and how great they looked with this. Even though our colors changed, I'll probably still use this for our thank you cards. Or maybe I'll photo shop and fix the color. Or maybe I'll re-paint the H, K, and O the right color purple. Or... maybe I'll do a whole other wreath! The options are endless here. What do you think hive?

[Insert poll here]
Question: What should I do with my Thank You wreath for our post-wedding thank you cards?
Option #1: Keep as is, who cares if the colors are off?
Option #2: Photoshop it baby! Don't make this harder than it has to be.
Option #3: Re-paint the letters. You want the colors just right, don't you?
Option #4: New wreath! New wreath! New wreath! We love DIY, so pleeease do a whole new wreath!