Thursday, April 5, 2012

Doing The D-I-Y: Ring Bearer Pillows

Okay hive, if you've kept up with my posts and managed to separate me out in your head from all the other fabulous bee bloggers, you know I've mentioned these darn ring bearer pillows a number of times. As we approached the wedding, and I was feeling heavy levels of resentment, this is one of the only wedding projects I managed to actually do myself.

I'd given sewing the pillows a couple of tries. I don't know why I insisted on doing it all by hand, but I did. This post will only be a step-by-step instruction manual for someone who already knows how to sew pillows by hand.
Personal Photo: Gather supplies. This was several spools of ribbon to be chosen for decorating later.

Personal Photo: Can't forget pillow stuffing.

Personal Photo: Needle, thread that perfectly matches your fabric, fabric glue, and rings for attaching anything you'd like.

Personal Photo: Step 1) Trace pattern onto fabric for exact pillow shape. I made two because I had two ring bearers. If you're decorating with ribbon, select choices and cut to a length that is just longer than the width of one side.

Personal Photo: Step 2) Pin decorative ribbon in such a way that the stitches of the pillow will secure it in place. Believe me, this is much easier than trying to sew the ribbon into place later, make sure the pins are secure and are holding the ribbon symmetrically and evenly.

Personal Photo: Step 3) Invert fabric and pin around the perimeter, making sure the decorative ribbons are secure in the right spot. Begin sewing the pillow, leaving about 3 inches not sewn together on one side. Take care to make sure the corners are reinforced.

Personal Photo: Step 4) Cute excess fabric off the sides of the pillow. Check over each seam to make sure they are secure as you don't want puckering when you flip your fabric right side out. This part will be sooo much easier if you just use a machine to do your sewing.

Personal Photo: Step 5) Accept help from your cat so she doesn't steal your thread. I made sure she didn't eat any thread, since I learned here on Weddingbee that can cause disastrous results.

Personal Photo: Step 6) Stuff your pillow. If you are making more than one pillow, stuff them all so you are sure they're the same amount of fluffy. Try not to pull on the open edges where your stitches began. Having to re-sew those later will be a pain.

Personal Photo: Step 7) Attach rings. This is just a sample I tried, but you can see the rings more clearly here. I stitched around the rings through the ribbon and the pillow. Tight, close loops around it will hold it in place. You can put the rings right next to each other or further apart.

Personal Photo: Step 7B) I wanted to add some curl to one of my decorative ribbons, so I found a bottle with the perfect size for the curls and went for it. Cut the length of ribbon you want, wrap around the bottle, and secure with a rubber band. I left mine for a couple weeks to ensure it would stay curled. It's still curled now 8 weeks after the wedding.

Personal Photo: Step 8) Add curled ribbon to the rings you've sewn onto the pillow. Arrange as you'd like. You can even add in another stitch to make sure they stay in place.

Personal Photo: Step 9) Admire your completed pillows. Also, plot for matching flower girl baskets.

Wedding Image showing Ring Bearers in action

Wednesday, April 4, 2012

Unveiling The Veil

Before I get into the recaps, I still have to finish the rest of my pre-wedding posts I didn't get to. First up is to talk about my veil. I found a veil I loved that perfectly matched my dress at the dress shop. Unfortunately, this lovely perfect veil was ~$300. That didn't work for me. That much money for 1.5 yards of fabric glued to a comb? Um, hell no.

We thought about ordering extra fabric from the designer and having the veil made. The store offered to do it for $275. Solution fail. I sat on it for a while. I read post after post on the Weddingbee blog and boards and then it hit me. "Stop acting like you don't have other ways to fix this problem crazy lady"

I turned to Etsy. I checked out really affordable veils by several Etsy stores I loved. I sent custom item requests to two sellers who's stuff looked very much like the veil I loved and in a price range I really loved.
Forget-me-not  30x36 wedding veil - 2 layers with tiny satin ribbon
Image: Forget-me-not 30x36 wedding veil by Etsy seller simplebeautyveils
DIAMOND WHITE  2 Tier Fingertip Bridal Wedding Veil Center Gathered / Butterfly Style finished with a delicate pencil edge.
Image: 2 Tier Fingertip Bridal Wedding Veil by Etsy seller BellaBridalVeils
I knew I couldn't care less if the actual veil was the exact, expensive but oh-so-soft, material of the dress skirt. I just wanted the color and a comparable material. After I sent the messages, I waited with bated breath for a response that would make me happy. I thought about messaging more sellers. But y'all know how I roll, hive. I see something I like and then I go with that, not looking at more than 2 options if I can help it before I make a decision.

But these first sellers didn't respond to my private messages, so I moved on. I found Joyous Illusions. This woman responded quickly and often to me. She messaged me back and forth well over 10 times.

She sent me samples, in the mail, of what veil options I had based on what I described I wanted.

Personal Photo: only a handful of the sample options she sent me.
After I finally made my decisions, she made a beautiful veil for me and sent me the pictures.

Picture from Joyous Illusions

Picture from Joyous Illusions

Picture from Joyous Illusions / Detail shot of the Swarovski Crystal appliques
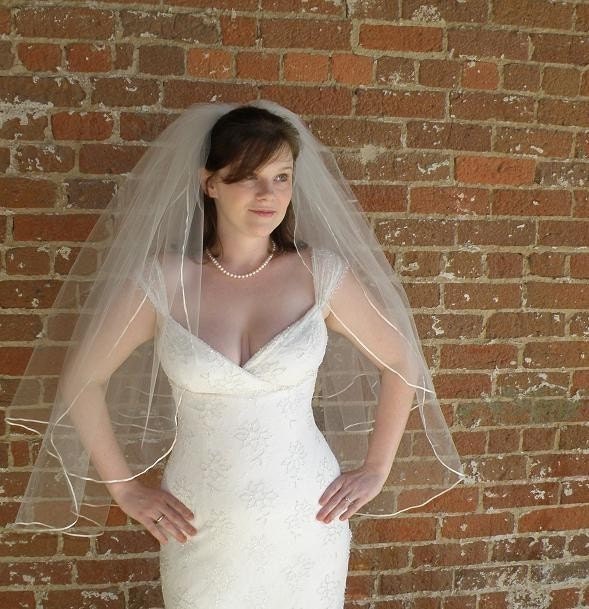
I hopped over to my private Etsy listing and bought my veil. She shipped it to me immediately. I was so happy to have taken care of a detail that haunted me for months, and I was really glad I didn't have to pay $300 for a veil.
Mr. Kettle and I posing before our ceremony.

Tuesday, April 3, 2012

Guess What Mrs. Kettle Has?


I decided not to leave you guessing. I've got pictures!! I'll be finally finishing the posts from pre-wedding land and then launching into my recaps.

Here are a few more photos to whet your palate. All photos have been released to me by my fabulous photographer Jolie Images. So all captions on pictures will be my commentary on the wedding moment, not a reference line.
Sneaking outside for a quick pic in the snow.

A lovely detail shot of our seating chart.

This is one of my favorite pics of all 1500 of them. It's Mr. Kettle and his 10 attendants.

Getting ready to put on my dress; it went so differently from how I pictured it.

Getting married, having prayer, feeling close.

Mr. Kettle and me with my immediate family.

Mr. Kettle and me with his immediate family.