Showing posts with label FSIL Hon. Show all posts

Sunday, August 21, 2011

Kettle Tea Party Reminder, Take Two

After the EPIC FAIL that was my first Save-the-Date mailings, I had to get back to work to send them out. By this point, we were only about 4 weeks out from our engagement party. We knew we were going to send out the STDs and the e-party invites together, along with a moo card. The moo card was going in the STD so that we wouldn't have to put it in our actual invites (how gauche and all that...)

To review, here's how I failed before:
1. Neglecting to include the DIY SAVE-THE-DATE bunting FSIL Hon and I spent hours making.
2. Not having a design that could easily be changed to our bridesmaid-dress-induced wedding color palette change.
3. Ordering too many STDs the first time around. Did I mention I ordered 1000 of the original moo cards, thinking I would put them in every mailing? And I put the wrong date on those? Major not-yet-mentioned fail!
4. Incorrect wording that could easily be fixed, but was still a pain.

So I got back on the computer and loaded up Microsoft Word and vistaprint.com. I was determined to fix my previous wrongs. And it took me a couple tries, mostly just moving things around and messing with fonts, but I got it done!

Wanna see it? Wanna see it? Sure ya do!

Here are our Moo Cards. Can anyone tell me why they're called Moo Card? Is it an acronym? Are there cows involved?

Personal photo
Personal Photo
That lovely monogram you see there we got for free at Things Remembered for buying their set of champagne flutes and cake cutters. I'm currently very much in love with the included Christmas tree ornament. Christmas is always on mind, even in July. They have some amazing designs and we're getting them engraved with our monogram.

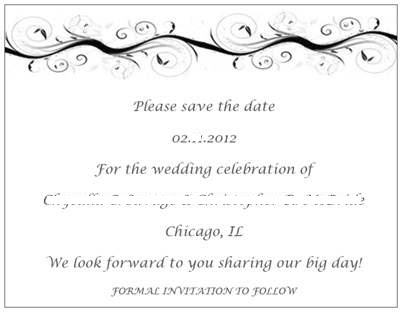
Here are our Save The Dates.

Personal photo
Personal Photo: I truly love love love that banner!
As you see, I still haven't blotted our my new last name. I love it so much, I want it to show. I couldn't bear to cover it up. I'm gonna be a McBride, lol! Get it? No? It's just me who watches too much Grey's Anatomy? That's fine. Moving on.

Here are our engagement party invites.

Personal photo
Personal Photo: I left up the address for the restaurant cause they're soooo good. Seriously, if you're in Chicago, try them!
We got these babies designed, ordered, assembled, and shipped in record time once we tracked down the addresses. As long as hardly anyone moves between now and the wedding, we're set!

I'm really proud of myself that I designed these all myself and they turned out to be exactly what I want our wedding to be: classic with a festive twist. I really like them, but I have to admit they're not as artistic as I'd like. They get the job done, but they are quite basic, and not quite as polished as they would be had a professional done them.

Mr. Kettle has been a well of goodness in this whole wedding planning thing. Every time I'm stumped as to the best route to go, he ends up supplying, without trying, the perfect solution. The best example of this is our wedding musicians, but I've already posted about that.

A good friend of his will be attending our wedding. His girlfriend is very sweet. She's also... wait for it... a photographer/graphic designer!! You can check out her blog here.

She agreed to take a look to see what we'd like done and we agreed to pay her for her trouble. If she designs something wonderful, I won't be surprised, but I'll be very glad I will have successfully outsourced something that is not my passion to someone who would love to do it and be good at it. So far her preliminary sketches look great and I can't wait to see how the design evolves.

Are you outsourcing any big projects you probably could DIY? Did you try to do something yourself only to graciously embrace what is/isn't a natural talent for you?

Friday, August 12, 2011

Kettle Tea Party Reminder, Take One

I saw all these things online, including Weddingbee, about brides who had designed their own save the dates. There were the picture booth STDs, the refrigerator magnet STD, the personal photo STDs. And then there were STDs that were some lovely combination of the three.

I thought, "I could do that!" I work 12 hour shifts sitting in front of a computer, I can knock those out with my occasional free time in a couple of shifts!" So I headed over to Vistaprint.com to see what I could come up with.

I quickly learned the easier thing to do was to design something myself about the right size on my beloved Microsoft Word and upload it as my own design. Making it the size of a postcard was waaaaay cheaper than paying $7.99 for every 10 invites of a different size.

Wedding Planning Tip #5: If you have a large guest list, don't order anything that only comes in sets of 10, except party favors.

I got to work designing the invitations. I used that first color that we came up with. The one that's on the Thank You wreath. I felt pretty proud of my design. I was feeling confident that I could easily design our wedding invitations as well since this had been so painless.


Personal photo: Original STD design
 I thought they were perfect. They were fun and casual, like an STD should be, but they also set a great tone for the wedding. They looked fun, full of love, and they used our colors beautifully. Plus, I was able to feature some of my favorites of the e-photos.
I was very satisfied with these and *brushing off my shoulders* in a very smug congratulatory manner. Trust me hive when I say, the higher you sail, the farther you fall.

I e-mailed these to Momma Kettle and Mr. Kettle. Mr Kettle said they were cool, Momma Kettle said they were alright. Not quite the standing ovation I was expecting.

Then more things happened.

1. I realized I'd forgotten to use the Save-The-Date Bunting picture. The one I spent hours preparing with FSIL Hon. I'd completely forgotten that ever-so-important-at-the-time project.

2. We changed our wedding colors. The guys had been waffling between gray and black and when they settled on black, that fade to gray in the picture just didn't work.

3. We hadn't actually sorted out how many people we were inviting, so I didn't actually know how many to order. At first I wanted to order 300 because that's how many guests we were inviting. Then I realized, we're not inviting that many households!!!!

4. Apparently, I worded it wrong too. "Formal Invitations to Follow" should read "Formal Invitation to Follow" My mother is a huge fan of appropriate etiquette and wording, as am I, so this just wouldn't do.

This was quite the epic fail on my part. Epic fail. I was lucky enough that the order I placed, for 300 STDs in the wrong color, could be cancelled and re-done.

I then began changing the STDs over and over again. My confidence shaken, I changed it at least 6 more times before settling on one. But by then, it was time to send out invitations for our e-party and our Moo cards. Sigh, it was quite a process. I'll show you all the final product after I've talked about our engagement party planning, which actually took place last Saturday!

Did you grow wiser and smarter after a DIY attempt fail? How did your STDs turn out?

Kettle Color Cull

Anyone want to say this post title three times fast? It's hard. Hehe, I crack me up.

Okay hive, it was quite the journey to our current color palette, but I'm very happy with how it turned out. I've alluded to our colors here and there and mentioned some changes we went through. Ultimately, I'm very happy with how it turned out.

When Mr. Kettle first proposed, I was thinking blue. Like a nice, happy, royal blue.

Image: Royal Blue Tuxedo Vest from Tuxedos Online
That didn't last long. Mr. Kettle and I agreed to it the night we got engaged, and we told my parents the idea and they loved it. Within 24 hours, his mother Mima Kettle suggested we do more of a royal purple instead.

Image: Royal Purple Paint Color from Art-Paints.com
Everyone liked that idea, including me. I was trying to pick a color that wasn't too feminine, but Mr. Kettle liked the idea of purple. So that became our color.

I was hesitant to nail down the rest of our colors because I knew I didn't want a white dress, but I didn't know what color I'd end up with. I was still thinking about that floral number. We were in color limbo for a couple weeks just on that image alone.

Luckily, Momma Kettle and I, along with FNIL Sniffles, FSIL Grand, and FSIL Hon, quickly chose a wedding dress for me. Knowing I'd have a taupe/tan/coffee/whatever dress (yes, those of you who guessed that one have yet another tip that you're thinking of the right dress!), I was given a bit more direction for the colors.

Mr. Kettle had this tie I hated, but I noticed was the perfect color scheme. The taupe in it perfectly matched my dress and it looked great next to black. Also, there were gold accents in the tie that matched something else: my shoes!


Image: Badgley Mischka Foxy Pumps / Available for Sale on Weddingbee by norahw!
I saw these lovely shoes in Lord and Taylor when I was shopping for birthday shoes last October. I immediately purchased them. I danced the night away and haven't worn them since because they're so fancy. I brought them with me to try on with wedding dresses and they went so well with my dress, it was an easy decision to make these my Something Old!

So we had purple, taupe/tan/coffee/whatever, and black, with gold accents. I felt like we needed to pick either white or ivory to round out the colors, but I couldn't decide. I did know I could see a sea of white-ish roses for bouquets or decorations, so we had to pick something in that value range.
There was a purple bridesmaid dress in there that went perfectly with my dress, the shades were sooo complimentary. That was the color I went with for my Thank You wreath for our e-pics. But that color choice didn't last long.

I'll explain how we got away from that shade of purple when I explain how we ended up with the bridesmaid dresses for my ladies. But just know for now that after searching for dresses, we changed to a magical color created by one Bill Levkoff called Regency.


Image: Bill Levkoff Color Swatch by Ella Park Bridal
 That color was a magical special color. It looks purple in real life. A beautiful, rich purple that compliments the skin tone of all my girls. And bonus, it photographs blue! And the blue color that shows up in photos is very similar to the color I wanted in the first place.

I couldn't decide between white and ivory so I basically flipped a mental coin and picked ivory because the color felt richer and warmer, which made me feel better emotionally about the colors for our wedding.

So now, our colors are: Regency, Coffee, Ivory, Black, and Gold accents. Thanks to Adobe Kuler, I was able to play around until I got just the right colors for our color palette.

By now you're all thinking, "enough talking! Just show us the colors!!!" Okay, here you go.


Image: Color Palette on Adobe Kuler
Having this palette has been super useful for things like our wedding invitations, which have just begun to be designed, yay!

Also for flower choices, and to help the guys visualize what color vests they'll be wearing. Which could be any of those. Except the gold. This isn't the 1970s.

How did you choose your color palette? Did it change a million times?

Tuesday, August 9, 2011

D-I-Y Didn't I Outsource... A Banner For Our Save-The-Date Mailings?

Hive, I have a confession. I'm crafty, but my intentions are not pure. When I first discovered Weddingbee, the blogger in me was dying to become a part. I wanted to be a Bee blogger so bad.

Knowing how they encourage DIY projects, I figured I'd have to do a couple and get them on my blog so when I applied, I would be a more appealing candidate. The benefit of these first couple of projects to my actual wedding were very very secondary. Whew! I feel good for getting that out.

I saw, on the lovely wide world web, lots o' DIY project of hand-made things for the bride and groom to hold while posing for pictures. Some say "thank you" and then are used for special order thank you cards for after the wedding.

I loved this idea and thought I could incorporate it into something fun as one of my first DIY projects. I wanted to make a banner for our STDs (hehe, still funny even though Bee after Bee has immaturity moments with this).

Bunting seemed like the easiest thing to do, so I went with it. A trip to Michael's secured all the supplies. And a large dining room table to use courtesy of Mima Kettle supplied the work area. I went to Michael's to pick up supplies for this and my other DIY project (a "thank you" wreath).

When I got back to the house, I set to work. It was a lot of steps and because I was working on both projects at once, it took all day. Plus I ran out of ribbon and had to take FNIL Tiny ('cause she's tiny) with me to Wal-Mart to find more. But FSIL Hon helped out tremendously. When I told her I was taking pictures in hopes of blogging about it in the future, she refused to let more than her hand be photographed, but I will get more shots the next time she's back stateside.

That's FNIL Tiny. She's waaaay high up in the tree in front of Mima Kettle and Kettle Dad's house. She's very helpful and she's going to make a great jr. bridesmaid!
To Make a Save-The-Date Bunting, You'll Need:

At Least 11 large pieces of felt. I got felt from Michael's in 8.5 by 11 sheets. I got two different colors from our wedding palette. Felt was better for us since our e-pics were being taken outside and I didn't want the wind to affect our photos.

Lots and lots of buttons. I think I bought a pack of 50 assorted white buttons, and that was just enough, no more no less. I picked that color so they'd stand out. I thought about painting them, but decided against it once I saw what the white looked like.

Glue sticks and a glue gun. This was my first time using one. It was pretty easy to figure out. You almost burn yourself once and you tend to avoid doing it again.

Ribbon. For the edges of the bunting triangles, the highlight of a sparkly ribbon make it stand out even more and camouflaged any uneven cuts. I ended up needing two spools of whatever the standard length is they sell on the spool at Michael's and Wal-Mart.

Scissors. If I have to explain why you need this, well never mind. You need scissors to cut the bunting triangles, the ribbon, etc.

String. You need something to string your triangles onto I chose a sparkly tan and gold string that FSIL Hon braided to make stronger. We didn't cut the length though on the chance we could re-use it for something.

Needle & Thread. Get a short yet strong needle and get thread that's also strong and closely matches the color felt you buy.


A paper template of the shape I wanted each triangle of fabric to have. I did this quickly on Microsoft Word. I stacked the felt and started cutting, not the smartest way to do it. If done over, I could cut out the shape, just pin it to each sheet individually and cut it out. It's felt, so it doesn't matter if you cut in the perfect center of each sheet.


FSIL Hon's hands gluing ribbon onto the edge of a cut-out triangle. We put the ribbon on first so we'd know how much space we had to measure out each letter in buttons.

This isn't the best quality photo, but it's trying to show you to put the glue on only a little at a time. And the glue goes along the edge, but completely on the front, not the side of the triangle. As you're pressing the ribbon in place, be aware that it's hot, get a cook (like me!) who's used to touching hot pots to help. Also, don't cut out ribbon lengths ahead of time, you'll just waste ribbon.


This is what you should have on your hand after gluing the ribbon to the edges of each triangle. This was important to do first so we'd know just how much space we had to place out each letter in buttons.


FSIL Hon and Mima Kettle put a lot of time into making these letters just right. I would have just laid them down randomly and gone to work. They look much better with the organization and symmetry I must admit. All the rest of the stuff on the table is from the Thank You wreath I also did that night.


If you look closely, you can see a ring of glue I put on the button. I glued each button into place one at a time so as to not mess up the lovely layout my new family worked so hard on.


We laid out each letter after it was glued to admire our work and figure out what to do next. At this point MOH Sis (Mr. Kettle's maid of honor and sister) came in and expressed her wish that she could be as crafty as us. I offered to teach her and got a nice non-committal "sure"


I'd planned on folding the top rectangle over to make a tube on which to string the bunting, but I hadn't yet figured out how. It was at this point I decided needle and thread would be the safest, most durable (pesky Windy City), but not quickest way to get this done.


I pinned the flap down and got to work sewing. Please ignore the crazy nails.
 

On the front side of the triangles, I made sure to put the needle back through as close as I could to where it came out. I wanted that invisible seam look you'd get on hemmed pants. That way, from the front, all you could see was lovely magically together bunting.
 
After I sewed the flaps down, we noticed it needed more definition. Though we were tired at this point, we kept going. The glass of wine Mr. Kettle poured us helped. I glued the ribbon down across the top and it looked sweet!


Did I mention Mr.Kettle also has a cat? She lives with his parents and will stay there since she doesn't have claws but my cat does. Since she's black, her name will be Kitty Pot (like the pot calling the kettle black when it's black? Get it? No? There go those crickets again.) At this point, FSIL Hon is trying to see about stringing her braided string through the triangles and Kitty Pot had to get in on all the string action. It's her way of helping.


She continued to help by sitting on top of the thread and holding up progress while we took a wine break. Kitty Pot doesn't think she's people like Kitty Kettle does. She knows she's a cat.

Kitty Pot then thought it wise to try and drag our entire bunting upstairs to play with. That's when the fun and games ended. She was not about mess up my first big hours-long project!

Our finished project looked lovely. We hung it on the curtain thingees so we could see what it looked like. Success!


Belle will now be called Kitty Kettle, named by Weddingbee! She's giving me her Family Guy disapproval eyes cause I was trying to snap her picture before heading to work when she wanted to eat. She really thinks she's people y'all.
I'd have to say this first big DIY project was a success even though I though it would take 2 hours top and it took closer to 9. But it turned out beautifully. You guys will love our e-photos with it. All that work for one freaking photo!!

I think I finally understand the term bride brain. I still think making that bunting was a good idea...

How did your first DIY go? Did it make you want to do more? Did you get help from family (human or not?)


Saturday, August 6, 2011

How To Be A Rebel Bride - Wedding Dress Edition

personal image
You will see this image I made in Paint (on my work PC) a lot. I do some rebellious things. I call myself a rebel a lot, but usually as a joke. My mother thinks I'm this bohemian girl. I've got the dreadlocks, I withdrew from med school on what seemed like a whim, I decided to get married after knowing Mr. Kettle for less than a year.

I march to the beat of my own drummer. But to a good number of my friends, I'm no rebel. I'm more traditional than most of them, if not more quirky as well. But I guess rebel is in the eye of the beholder...?

That being said, I've come to embrace being a rebel. Having that quick and dirty label allows me to make more decisions about this wedding without too much fuss from Momma Kettle and my FMIL who I will call Mima Kettle from this point on.

How exactly does one become a rebel bride? The first step is to pick something big and go against the grain with much gusto (ha! I made a multi-language pun!). For me, it was the wedding dress. I was in a cotillion and I wore the white wedding dress. With all the rules of a church run cotillion, I was all buttoned up. My dress was similar to this:

Image: Long-Sleeved Satin and Lace Ball Gown from David's Bridal
Of course my dress wasn't nearly this pretty. As the time, dresses were all about pearl beading and heavy appliques. I there was no way I was allowed to rock the sheer lave sleeves. Needless to say, I wasn't going for anything like that AT ALL this time around.

Momma Kettle and I were no strangers to discussing my upcoming wedding long before I had a FI in mind. Once I was engaged and wedding planning could be discussed without obligatory apologies for being presumptive, we could hash out concrete details. I told her long ago I didn't want a white dress.

I don't think she thought I would still feel that way when confronted with real wedding plans, but that wasn't the case.

At first, I was envisioning something like this:

Image: Lovely Ish Blog
A self-awareness check of my wide hips and short height and torso quickly cured me of wanting this dress, but I was in love with the luxurious looking fabric, the neutral tone, and the feminine romance.

After more searching, I came across more dresses I loved.


Mon Cheri Bridals Wedding Dresses and Bridal Gowns Collection presented by The Bridal Shop on thebridalshop.com Style #18246
Image: The Bridal Shop Website / Delilah Dress by Mon Cheri Bridals
This first one was about as close as I figured I'd ever get to a white dress. I loved all the detailing on it, but wasn't crazy about the train.

Image: Unique-Vintage Website
I loved the neckline on this dress. I noticed it looked more cream than white so that made me happy. The price of it really made me happy.

Image: Strapless Printed Organza Dress By David's Bridal
When I first saw this dress, it was more orange flowers than pink flowers. They've recently updated it, but kept the same link. I loved this dress so much but really couldn't see how organza could work for a February wedding. I even dragged BM Libra out for a secret shopping trip to try this dress on before I was officially engaged.

Personal Photo: BM Libra, who's birthday is only 3 days before mine, looking cool in a stressful situation, ie, visiting a friend at the hospital.
She kept my secret and here I am revealing it to the entire internet. But they didn't have the dress available for me to try on that day. No harm no foul, right?
I ended up making a 25 page document on Microsoft Word for my mother that showed every dress I thought I might want. The only ones that were white either came in other colors or had colorful details. Did I mention I didn't want a white dress?
Well, we had to narrow it down, so I looked at the list and realized I was really loving dresses by Allure Bridals. They were just my style.

The following pictures are all Allure Bridal Gowns that are representative of why I love their dresses so much.
#8854
#8866

#8867

#8753
#8803

#8754

#8712
With all these dresses, I thought I might find a white dress I could love. It seemed like an amazing compromise for Momma Kettle and I to make. She never said I couldn't wear a non-white dress, but let's just say that I knew it would be best for everyone if we met in the middle.

The two bridal salons in Chicago that carry lots o' Allure Dresses were, according to the website, were House of Brides in Oak Lawn, IL and Eva's Bridal in Tinley Park, IL.

We made appointments for both shops on one Saturday. I called up Mima Kettle and lots of her offspring. Side note: I didn't mention it yet, but Mr. Kettle's family is huge. Huge! Okay, so I also called up one of my FSILs, we'll call her FSIL Grand (cause she's a grandmother).

Mima Kettle couldn't join us, but FSIL Grand could along with another FSIL Hon (cause she's from Honduras). and FSIL Grand's daughter, FNIL Sniffles (cause she has allergies). Y'all know there's going to be a ton of people mentioned in connection with this wedding, right? I should have a giveaway for whoever can keep them all straight.

My mother and I went to the first dress shop and I tried on a lot of dresses. I wasn't allowed to take pictures. But... I... snuck and took a quick one of the bevy of dresses I tried on.

Personal Photo
This dress shopping trip was very useful. I learned that Momma Kettle has to have her arm twisted to give me an honest opinion if she disagrees with my original assessment. I learned that my instinctive hate for trains is correct because I'm so little their weight makes me tip over. I learned that when I really like a dress, I will twirl like I'm 6 years old and demand a veil like I'm a Bridezilla.
Look at my personal photo again. The dress all the way to the right look familiar? I posted it above as one of the ones that caught my eye online. When I walked into the store, I promptly forgot about it. But my dress coordinator pulled it as an option for me and it was her piece de resistance.
I got into that dress and loved it! Here it is again from the website:
I had never considered a tea-length gown until this point, but it ended up being an amazing length dress on my 5'0" frame. The a-line skirt was just my speed. The sweetheart necklace was something I already knew worked amazingly well for me.

I was in love and ready to buy the dress right then and there. Momma Kettle said we could get that dress if I wanted, or we could go to our other dress appointment and come back if that's really what I wanted. I understood that was code for "Why must you always go for the first thing you fall in love with? Explore your options boho girl!"

I knew she also wasn't thrilled with the organza 3D flowers (we didn't even know that was a thing until that morning), so we moved on. I told her as we left she was probably throwing away her one chance to get me into an all-white dress.

We headed to the next store and we had a super friendly consultant. She pulled a number of dresses in our price range and started putting me in dresses. Right as we were getting a bit energy-depleted, FSIL Grand, FSIL Hon, and FNIL Sniffles joined us. Their energy really revamped the party and I tried on upwards of 25 dresses.

My dress consultant was having fun because she said it like playing dress up with her own little Barbie doll. I couldn't be called life size because she had at least a foot of height on me even before her heels. During all this dress-up, I found a dress that I truly loved, just not as much as the one at the other store.

The dress was by a designer I really liked that I'd never heard of before that day. His name is Justin Alexander. I was all set to go back and get that first dress with the 3D organza flowers when I happened to mention to my dress coordinator that I really truly wanted a non-white dress. She told me the one I had just taken off comes in taupe. I was over the moon to try it on. So she dug it out of it's box. No other bride had yet tried it on, it had just come from the designer.

It. Was. Heaven. Heaven!! If I can get Mr. Kettle to swear he won't peek, I'll post a picture of it here. But it was AH-mazing, hive. It was everything I loved about that first dress, but not in white, and without the 3D flowers (which made Momma Kettle happy, I think). For the first time all day, I truly felt like a bride. Not like a catalog model, but like me, as a BRIDE.

I think our dress consultant was a bit surprised when we had our "Say Yes to the Dress" moment and no one cried or got emotional. The Kettles, my side and Mr. Kettles, are emotional people, but criers we are not. We express our emotions more with drama and laughter and the occasional look-that-could-kill. So, sorry dress lady that we had no use for your tissue.

It was an easy decision for me to get that dress once I put on the matching taupe veil and twirled around the store. Momma Kettle called Grandmother Kettle to update her on our shopping trip. Grandmother Kettle reminded her that I was unusual and therefore would want an unusual dress. Seeing my enthusiasm as well as the enthusiasm of my new sisters and niece, she was sold. We put down a deposit on the dress that day and got their "love it at first sight" discount.

My coordinator left me alone in the dressing room and I, along with FNIL Sniffles pulled out my camera and took beaucoup photos so I could show Mima Kettle and all my bridesmaids. I really want to put up the photos here, hive, but I just can't take that chance yet.

I have a habit of finding something on Day One and knowing that's the one. It happened with my wedding dress, my wedding venue, my new apartment, and my wedding shoes. It would have happened with Mr. Kettle had I not been so emotionally cut off when we first started hanging out.

It bugs Momma Kettle and Mr. Kettle because they think I'm not exploring all my options. But I'm so indecisive that when I feel strong about a decision, I go with my gut. I've never made a gut decision and changed my mind after more thought, at least not about anything semi-permanent (permanent enough that it involves a down-payment).

Up next, I'll explain how I got rebellious on the choice of wedding venue.

How many trips to stores did it take before you found your dress? Did those shopping with you agree with your selection? Did you end up with the dress you thought you'd buy?